Hope you’re ready, cause I’m gonna blow your mind with this one.
Cause it’s time for another Lawrence Kansas story.
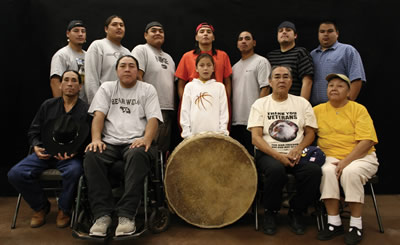
Let’s start out with Haskell University. I remember like it was yesterday…or something like that. My family and I got together here in Lawrence and got to go to a Pow Wow festival. We were there from back in the day and it was exciting to watch. We heard the drumming and the singing during the ceremony.
Ever wonder what Pow Wow music looks, hears, and feels like?
Well…
It’s a gathering with dances held by many Native American and First Nations communities. Powwows today allow Indigenous people to socialize, dance, sing, and honor their cultures. Powwows may be private or public, indoors or outdoors. Dancing events can be competitive with monetary prizes. Powwows vary in length from single-day to weeklong events.
And in Lawrence, they still do it every year.
I remember that time when my family and I went there to see my friend Phillip ‘Bigg Phil’ Wahwahsuck perform his pow wow dancing outside of Haskell. We were so thrilled to see him dancing. It was in the beginning of the month of September and we watched him play. Boy, we were happy to see him once again.
I wonder if I can go to the Haskell Indian Art Market again and watch the pow wow dancing again. If so, we’ll soon find out.
If you haven’t noticed yet, maybe I might be looking forward to checking out the pow wow festival at Haskell sometime in the future. I hope that I join in and watch them dance again. Yet I can’t wait until I get see Phillip once again.
He’s also a friend of mine that I met in Cordley Elementary School.
My favorite part of the festival was the music. The drums sound really good and the dancing was amazing. The outfits were incredible. Even the feathers look good on them too. I really love how the pow wow music sounds like outside.
If you haven’t yet read my pow wow story on my blog, check out the Haskell Indian Art Market. It’s got everything to check out every year, even I can get the chance to look at some really authentic jewelry. They have dream catchers too. Native tradition says that the strings catch the bad dreams and good dreams go into the center. And…no more nightmares. Sweet dreams.
I really hope that I will get together and hear some great pow wow music and see the dancing again someday soon. Why? Because it’s one of the best things that I wanna check out in the town of Lawrence. Phillip, this is for you my friend.
Say hi to the folks, Phillip!
Now, here's some instructions on how to make your own dreamcatcher.
Part 1: Gathering Your Materials
1. Select a metal or wooden hoop. Pre-made metal or wooden hoops are easy and work great for dreamcatchers. The size of the hoop you buy really depends on how big you want your dreamcatcher to be. However, if this is your first time making a dreamcatcher, try a 5 to 8 inch (13 to 20 cm) hoop. These hoops are neither too big nor too small for beginners.
- These hoops can be found at your local crafts store in the yarn and crocheting aisle.
- Embroidery hoops are another good option for dreamcatchers.
2. Use suede lace or ribbon to wrap the hoop. Choose leather or buckskin suede lace. Use a length of lace that is 18 times greater than the diameter of the hoop you are using and with a width no larger than the width of a shoelace, which is about 0.5 in (1.27 cm).
- For example, if you are using a 5 in (13 cm) hoop, use 2.5 yd (2.3 m) of lace.
- If you do not want to use suede lace, then you can also use ribbon.
3. Choose string for the web. Select a string that is both strong and flexible. Artificial sinew, hemp cord, waxed nylon string, or silk thread all work great. Cut the string so that its length is ten times the diameter of the hoop. Traditionally, natural-colored string is used, but you can use any color you want.
- For example, if you are using a 5 in (13 cm) hoop, then you will need 50 in (127 cm) of string.
4. Pick your decorative materials. How you decorate your dreamcatcher is completely up to you. You can use feathers, strips of fabric, beads, gemstones, and shells to decorate your dreamcatcher. Choose materials that have personal meaning for you.
Part 2: Wrapping the Hoop
1. Place a 0.5 in (1.3 cm) line of glue on the top of the hoop and wrap the suede lace around it. Holding the end of the suede lace against the hoop, wrap it around the line of glue. When you are wrapping the suede lace, make sure there are no spaces between the pieces of lace. Once you have wrapped the glued section, use a small binder clip to hold the lace in place and wait for the glue to dry. This will take about five minutes.
- Wrap the suede lace tight enough so that you can’t see the hoop underneath.
- Use regular craft glue.
- If you are using regular ribbon, tie a double or triple knot at the starting point instead of using glue to secure the ribbon.
2. Wrap the suede lace around the entire hoop tightly so there are no gaps. Place a thin line of glue on at least four evenly-spaced spots on the hoop as you continue to wind the lace around. This will ensure that the lace stays in place.
- Make sure to use the small binder clips to hold the lace in place where the glue is.
- Tightly wrap the lace around the hoop so that each loop is touching but not overlapping one another.
- If you are using ribbon, use the same strategy to secure the ribbon around the hoop.
3. Stop wrapping the lace once you arrive back at the starting point. Before you get to the end, place a final line of glue on the hoop right next to the first loop. Finish wrapping the lace and secure it with a small binder clip where you placed the last line of glue.
4. Let the glue finish drying for about 15 to 20 minutes. Set the rings aside and let the glue do its thing and dry for up to 20 minutes. After the time’s up, take off the clips and cut off any extra pieces of lace or ribbon.
Part 3: Weaving the Web
1. Tie the string securely to the top of the circle. Cut 2 yd (1.8 m) of string. Start by tying a knot at the top of the hoop. Tie a double or triple knot to ensure that the string is secure.
2. Loop the string around the hoop at 2 in (5 cm) intervals. Working clockwise, stretch the string to a spot about 2 in (5 cm) over on the hoop. Loop the string around the hoop and back over itself to create a hitch. Make sure to pull the string tight to secure it before moving on to the next loop.
- Pulling too hard on the string may warp the shape of the dreamcatcher.
3. Continue looping the string around the hoop. Loop the string around the entire frame until you reach the top of the hoop where you started. As you do this, go slowly to make sure the loops are evenly spaced. Once you reach the top, loop the string around the hoop next to the starting knot.
- There will be an odd number of loops.
4. Loop the string around the midpoint of the first line of thread to start the second layer. Using the same technique, loop the string around the center of the string in the first layer and then back over itself to create a hitch. Continue weaving the thread this way until you reach the top of the hoop.
5. Continue weaving layers until a small circle forms in the middle. As you weave the web, the circle in the middle will get smaller and smaller. Weave the string until only a small circle is left in the middle of the dreamcatcher. Make sure to pull the string tight to secure the web.
6. Secure the web with a knot. Once the circle is small—about the size of a penny or dime—tie a knot around the next string instead of hitching it. Tie a double or triple knot to make sure the string is secure and will not come undone. Then trim off any extra string with a pair of scissors.
7. Make a hanging loop. Cut a 5 in (13 cm) piece of suede lace. Tie the loose ends into a knot to make a circle. Secure the lace around the top of the hoop by pushing the knot through the loop. Then pull tight to create the hanging loop.
Part 4: Decorating
1. Loop beads into the web. You will need to do this as you make the web. Place a bead on the string before you loop and hitch it to the next string. You can either space them out randomly, or create a pattern by placing a bead on every other string.
2. Hang strips of fabric. Purchase different colors or patterns of fabric. Cut the fabric into strips and fold the strips in half to create a loop. Place the loop underneath the bottom rim of the dreamcatcher, then thread the ends of the fabric through the loop and pull tight to secure it.
- You can also do this technique with suede lace, strips of leather, or any other type of string to create a dreamy hanging effect.
3. Thread beads onto the strips of fabric. Position the bead to where you want it on the string, then tie a small knot underneath the bead. The knot will hold the bead in place. You can string multiple beads on one strip of fabric in all kinds of fun and colorful patterns.
4. Hang feathers from the bottom of the dreamcatcher. Group four to five feathers together and use a small binder clip to hold them together. Then, tie and knot a string around the tops of the feathers to secure them. Finally, tie and knot the string along the bottom of the dreamcatcher.
- You can also thread various beads onto the strings before you attach them to the dreamcatcher.
And there you have it. A dreamcatcher. If you'd like to teach me how to make a dreamcatcher of my own. Please let me know and we'll get started.
Now here's my top ten for the week.
Today's top ten: Native American Music
10. “Yeha-Noha (Wishes of Happiness and Prosperity)” by Sacret Spirit
9. Tommy Wildcat
8. The Black Lodge Singers
7. “Cherokee Morning Song” by Walela
6. “White Buffalo” by Robert Tree Cody
5. “Colors Of The Wind” from the Disney film ‘Pocahontas’
4. Blackstone Singers
3. Sky Ferreira (Chippewa Cree)
2. Joanne Shenandoah
And for the number one in Native American music
1. R. Carlos Nakai
There you have it. The story about Pow Wow dancing and the music.
This blog goes out to a friend of mine from Cordley, Phillip Wahwahsuck.
Phillip, this is for you.
Until next time, keep it real.


Comments
Post a Comment